☕️ Java Slf4j & Logback intro
Java日志框架
本文介绍Java应用中最常使用的日志框架组合:slf4j + logback。
为什么要有slf4j?
如果在代码中使用log4j框架来输出,那么代码是这样的:
import org.apache.log4j.Logger;
//省略...
Logger logger = Logger.getLogger(Test.class);
logger.trace("trace");
//省略..
后面切换为JUL,需要修改代码:
import java.util.logging.Logger;
//省略...
Logger loggger = Logger.getLogger(Test.class.getName());
logger.finest("finest");
//省略...
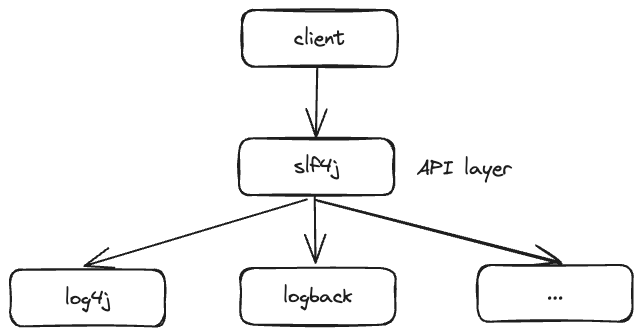
这样每次切换日志框架,都需要修改代码,改动成本太高。所以slf4j提供了一个统一的API层,我们统一条用slf4j的相同接口,程序根据classpath中的桥接器类型,和日志框架类型,判断出logger.info应该以什么框架输出。
使用slf4j,我们的代码可以改为这样:
import org.slf4j.Logger;
import org.slf4j.LoggerFactory;
//省略...
Logger logger = LoggerFactory.getLogger(Test.class);
//省略...
logger.info("info");
The Simple Logging Facade for Java (SLF4J) ==serves as a simple facade or abstraction for various logging frameworks== (e.g. java.util.logging, logback, log4j) allowing the end user to plug in the desired logging framework at deployment time.
slf4j使用入门
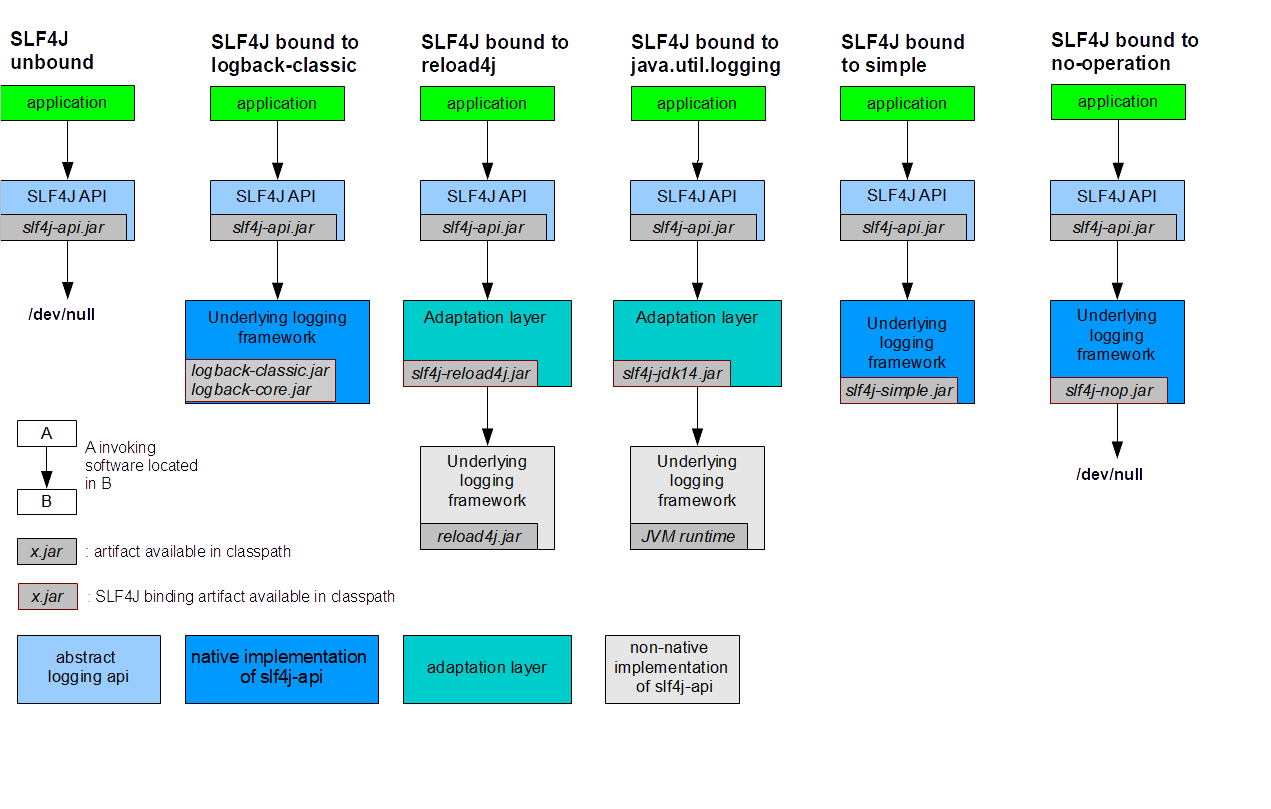
我们使用SLF4J bound to logback-classic这个方案,所以需要依赖于三个jar:slf4j-api.jar, logback-classic.jar和logback-core.jar
- 在pom.xml中增加对slf4j的依赖:
<dependency>
  <groupId>org.slf4j</groupId>
  <artifactId>slf4j-api</artifactId>
  <version>1.7.26</version>
</dependency>
添加依赖之后,就可以使用slf4j提供的API了。
- 在pom.xml中增加对logback(或者其他的日志框架)的依赖:
<dependency>
    <groupId>ch.qos.logback</groupId>
    <artifactId>logback-core</artifactId>
    <version>1.2.8</version>
</dependency>
<dependency>
    <groupId>ch.qos.logback</groupId>
    <artifactId>logback-classic</artifactId>
    <version>1.2.8</version>
</dependency>
在pom.xml中引入新依赖之后,在idea中sync一下依赖。
- 编写测试代码:
import org.slf4j.Logger;
import org.slf4j.LoggerFactory;

public class TestSlf4J {
    private static final Logger logger = LoggerFactory.getLogger(TestSlf4J.class);

    public static void main(String[] args) {
        logger.info("hello, slf4j!");
    }
}
输出:
13:54:47.754 [main] INFO TestSlf4J - hello
slf4j有五种日志级别,从低到高依次为
- trace:log events with this level are the most fine-grained and are usually not needed unless you need to have the full visibility of what is happening in your application and inside the third-party libraries that you use. You can expect the TRACE logging level to be very verbose.
- debug:less granular compared to the TRACE level, but still more than you will need in everyday use. The DEBUG log level should be used for information that may be needed for deeper diagnostics and troubleshooting.
- info:the standard log level indicating that something happened, application processed a request, etc. The information logged using the INFO log level should be purely informative and not looking into them on a regular basis shouldn’t result in missing any important information.
- warn:the log level that indicates that something unexpected happened in the application. For example a problem, or a situation that might disturb one of the processes, but the whole application is still working.
- error:the log level that should be used when the application hits an issue preventing one or more functionalities from properly functioning. The ERROR log level can be used when one of the payment systems is not available, but there is still the option to check out the basket in the e-commerce application or when your social media logging option is not working for some reason. You can also see the ERROR log level associated with exceptions.
如何设置日志的级别,在logback配置中会讲。
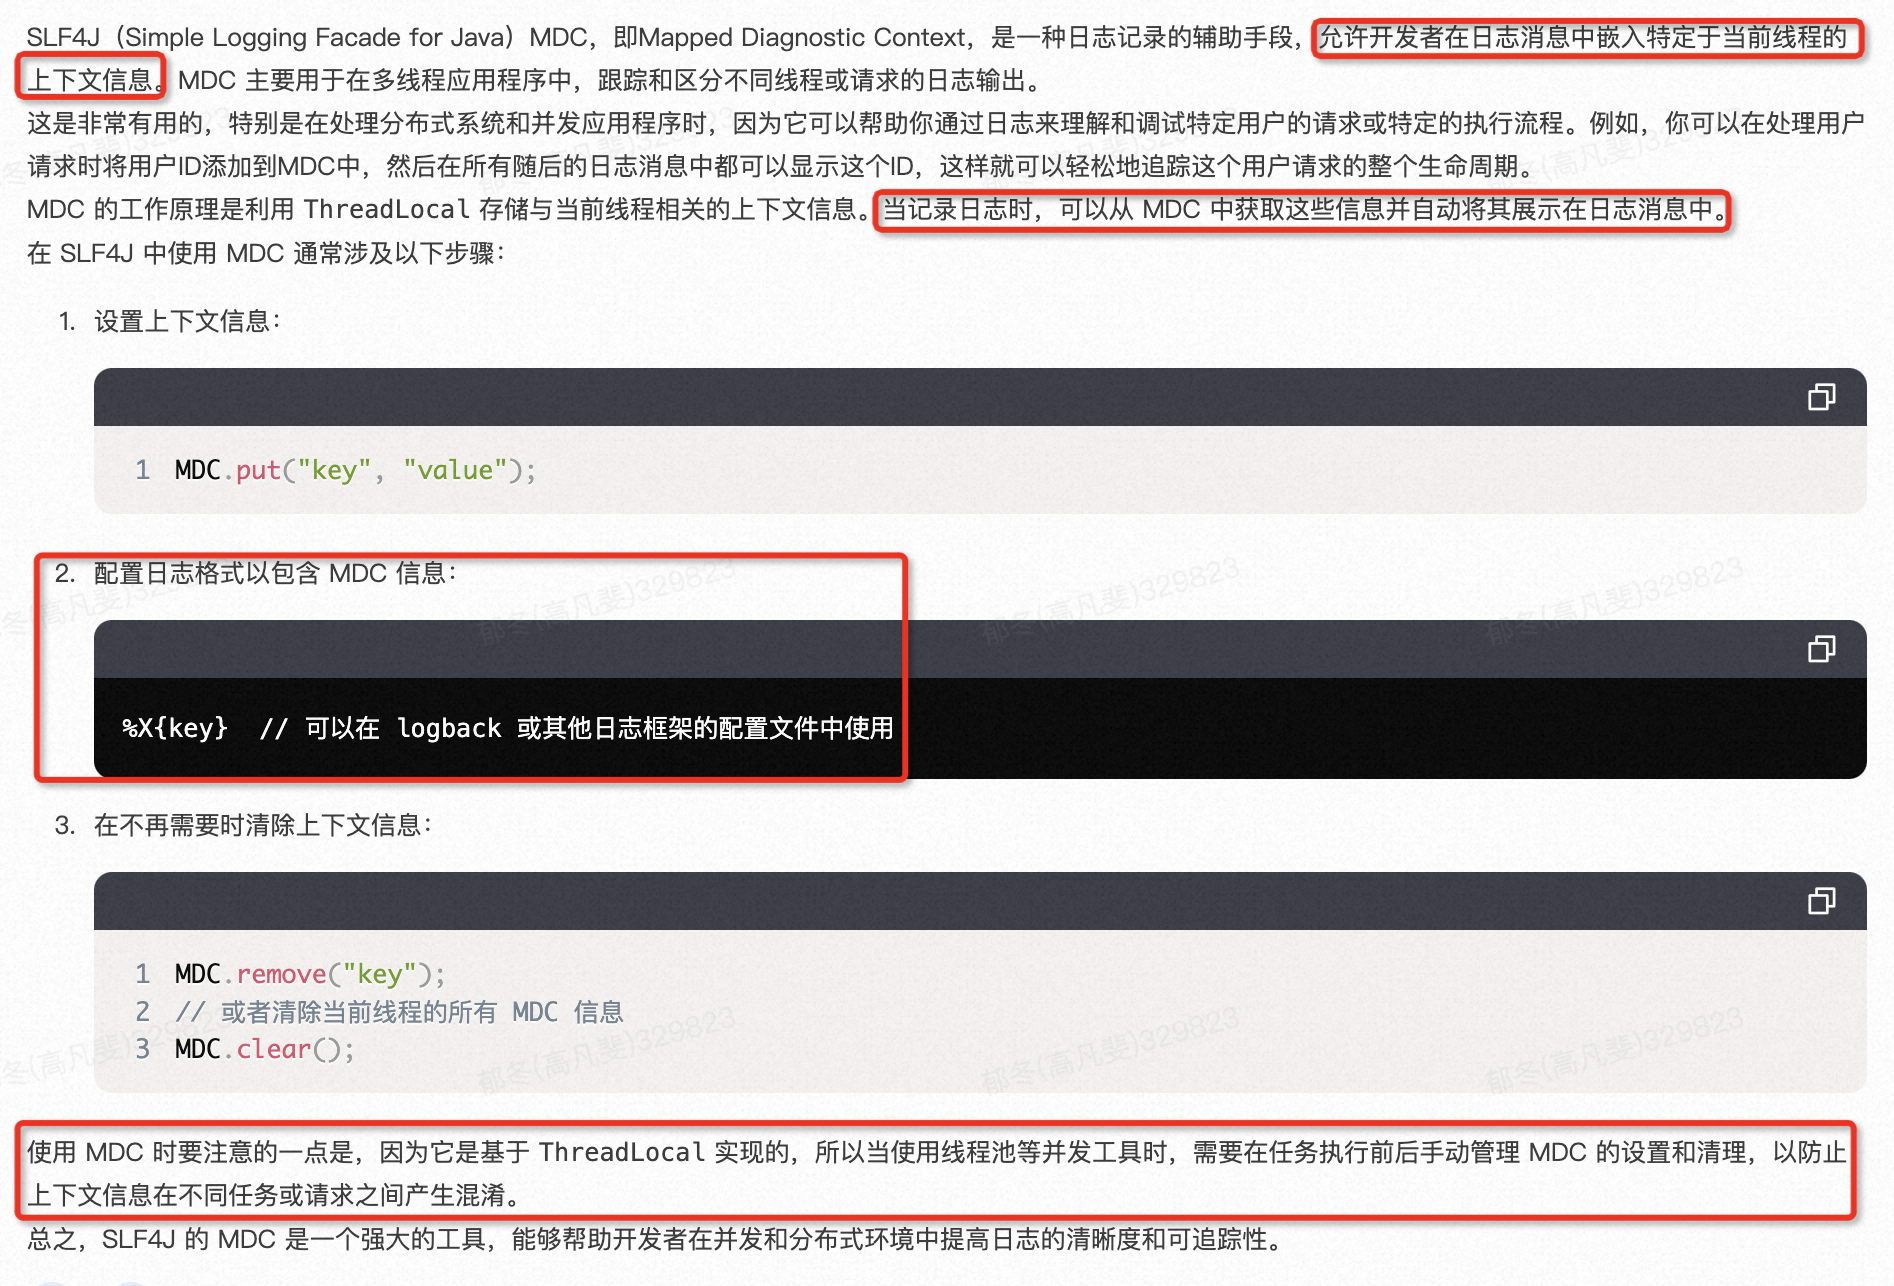
Slf4j多线程追踪利器:MDC
SLF4J supports the Mapped Diagnostic Context which is ==a map where the application code provides key-value pairs which can be inserted by the logging framework in the log messages==. If the underlying logging framework supports the MDC then SLF4J facade will pass the maintained key-value pairs to the used logging framework.
For example, we can include user with all the log messages:
import org.slf4j.Logger;
import org.slf4j.LoggerFactory;
import org.slf4j.MDC;

public class TestSlf4J {
    private static final Logger logger = LoggerFactory.getLogger(TestSlf4J.class);

    public static void main(String[] args) {
        MDC.put("user", "rafal.kuc@sematext.com");

        logger.debug("This is an debug level log message.");
        logger.info("This is an info level log message");
        logger.warn("This is an warn level log message");
    }
}
在logback的配置文件中配置输出信息的pattern,就可将user对应的值打印出来。这里的%X{user}的意思是打印出MDC中key为user的值。
<configuration>

    <appender name="STDOUT" class="ch.qos.logback.core.ConsoleAppender">
        <encoder>
            <pattern>
                %d{yyyy-MM-dd HH:mm:ss.SSS} [%thread] %highlight(%-5level) %cyan(%logger{36}) %X{user} - %msg%n
            </pattern>
        </encoder>
    </appender>

    <root level="info">
        <appender-ref ref="STDOUT" />
    </root>
</configuration>
输出:可以看到,在loggerName之后,带有user对应的值。
2023-12-19 14:33:46.831 [main] INFO  TestSlf4J rafal.kuc@sematext.com - This is an info level log message
2023-12-19 14:33:46.831 [main] WARN  TestSlf4J rafal.kuc@sematext.com - This is an warn level log message
下面是chatGPT关于MDC的描述,感觉还是很准确的。
logback的配置方法
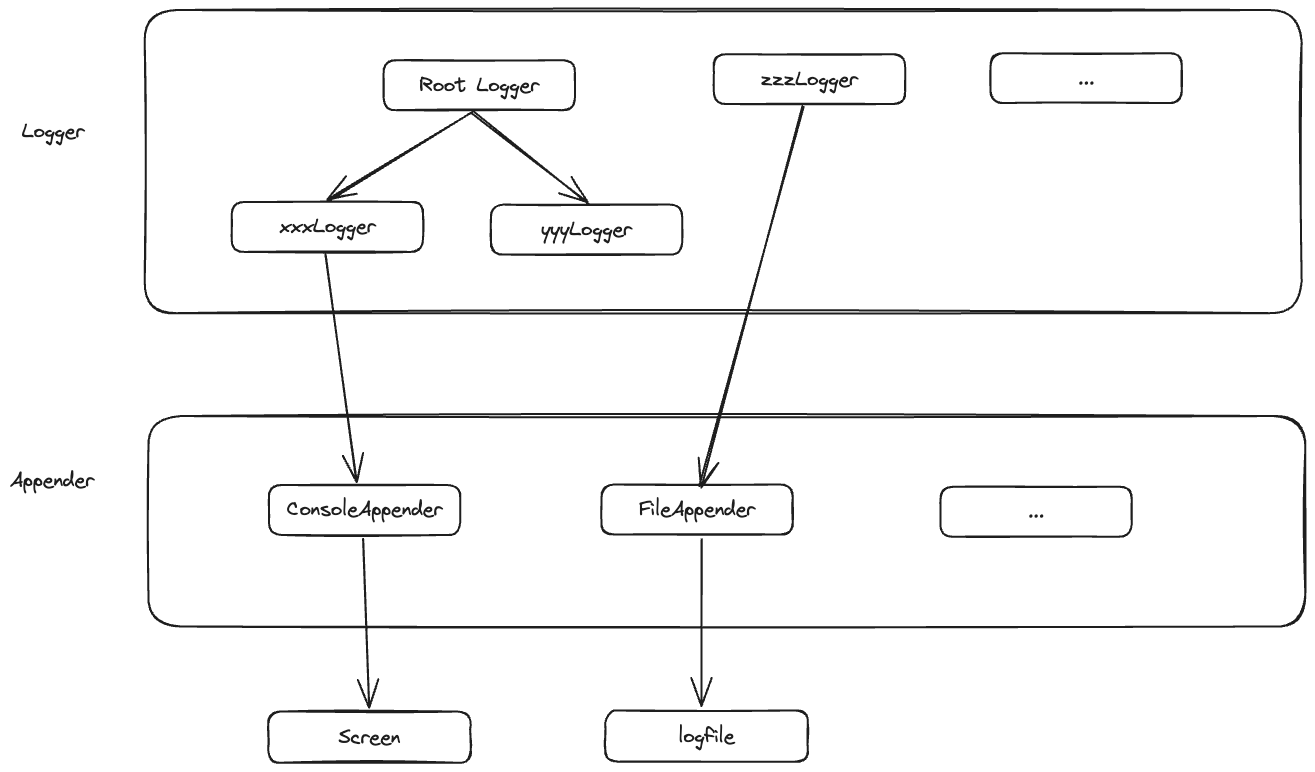
在讲解具体logback.xml文件的内容之前,需要先了解三个概念:
- Logger 日志记录器:日志记录器就是一个普通的Java类
- Appender 输出源:输出源是日志最终输出的地方,比如控制台或者文件
- Layout(Encoder)布局:布局决定了日志的打印格式,比如使用
%r [%t] %-5p %c %x - %m%n可以打印出467 [main] INFO org.apache.log4j.examples.Sort - Exiting main method.这样的日志。
Logger类位于logback-classic模块中,而Appender和Layout位于logback-core中。这意味着,Appender和Layout并不关心Logger的存在,不依赖于Logger。 同时可以看出,Logger会依赖于Appender和Layout的协助,这样日志信息才会被正常打印出来。
日志记录器 - Logger
在logback中日志记录器是继承的,继承的规则是 com.hello.foo 会继承 com.hello的日志配置,父子关系通过.来分割,所以 com 是com.hello的父节点。
在logback中默认会有一个root-logger(根 - 日志记录器)的存在,所有的其他日志记录器都会默认继承它的配置。
<root level="debug">
  <appender-ref ref="STDOUT" />
</root>
所以当我们调用Logger logger = LoggerFactory.getLogger(App.class);的时候,默认是从root-logger那里继承了日志输出配置。
如何配置一个普通的日志记录器呢?
<logger name="com.hello" level="INFO"/>
name是必须配置的属性。然后可以通过 Logger logger = LoggerFactory.getLogger("com.hello")来得到这个日志记录器。
日志输出源 - Appender
输出源配置把日志打印到控制台,输出源的 name 和 class 属性是必须配置的选项。class用来指定哪种输出策略,常用就是控制台输出策略和文件输出策略。
ConsoleAppender
配置将日志打印到控制台:
<appender name="STDOUT" class="ch.qos.logback.core.ConsoleAppender">
	<!-- encoders are assigned the type ch.qos.logback.classic.encoder.PatternLayoutEncoder
		by default -->
	<encoder>
		<pattern>%d{HH:mm:ss.SSS} [%thread] %-5level %logger{36} - %msg%n
		</pattern>
	</encoder>
</appender>
FileAppender
配置将日志打印到文件:
<appender name="FILE" class="ch.qos.logback.core.FileAppender">
    <file>myApp.log</file>
    <append>true</append>
    <encoder>
      <pattern>%date %level [%thread] %logger{10} [%file:%line] %msg%n</pattern>
    </encoder>
</appender>
- encoder:对日志进行格式化
- target:字符串System.out(默认)或者System.err
- file:被写入的文件名,可以是相对目录或绝对目录,如果上级目录不存在会自动创建。
- append 追加或覆写
RollingFileAppender
配置把日志打印到文件——将日志文件切分:
<appender name="APPLICATION" class="ch.qos.logback.core.rolling.RollingFileAppender">
	<file>${LOG_FILE}</file>
	<encoder>
		<pattern>%date [%level]|%X{EAGLEEYE_TRACE_ID}|%msg%n</pattern>
		<charset>UTF-8</charset>
	</encoder>
	<rollingPolicy class="ch.qos.logback.core.rolling.SizeAndTimeBasedRollingPolicy">
		<fileNamePattern>${LOG_FILE}.%d{yyyy-MM-dd}.%i.log</fileNamePattern>
		<maxHistory>7</maxHistory>
		<maxFileSize>200MB</maxFileSize>
		<totalSizeCap>30GB</totalSizeCap>
	</rollingPolicy>
</appender>
- rollingPolicy:当发生滚动时,决定
RollingFileAppender的行为,涉及文件移动和重命名。属性class定义具体的滚动策略类 常用的如SizeAndTimeBasedRollingPolicy,属性如下: - fileNamePattern:定义了日志的切分方式——把每一天的日志归档到一个文件中。
- maxHistory:表示只保留最近7天的日志,以防止日志填满整个磁盘空间。
- maxFileSize:单个文件最大值
- totalSizeCap:用来指定日志文件的上限大小,例如设置为1GB的话,那么到了这个值,就会删除旧的日志。
有了输出源之后,就可以给logger配置输出源,一个logger可以配置多个输出源:
<root level="debug">
    <appender-ref ref="STDOUT" />
    <appender-ref ref="FILE" />
</root>
在logback中,level的配置会被继承,但是appender的配置会被子logger保留。这么说有点抽象,看下面的例子:
<configuration>

  <appender name="STDOUT" class="ch.qos.logback.core.ConsoleAppender">
    <encoder>
      <pattern>%d{HH:mm:ss.SSS} [%thread] %-5level %logger{36} - %msg%n</pattern>
    </encoder>
  </appender>

  <logger name="com.hello">
    <appender-ref ref="STDOUT" />
  </logger>

  <root level="debug">
    <appender-ref ref="STDOUT" />
  </root>
</configuration>
这个配置会导致控制台打印两次:
11:38:06.068 [main] INFO  com.hello.App - Hello world.Info
11:38:06.068 [main] INFO  com.hello.App - Hello world.Info
当调用LoggerFactory.getLogger("com.hello.App") 的时候,它继承了来自 <logger name="com.hello">和 root-logger 的输出源,而他们的输出源都是控制台,所以导致在控制台输出了两次。
解决办法是,要么在有继承关系的logger中配置不同的输出源(从业务上避免),要么在子logger中覆盖父节点中的配置。可以通过additivity="false" 配置实现:
<logger name="com.hello" additivity="false">
    <appender-ref ref="STDOUT" />
</logger>
参考:
https://ata.atatech.org/articles/11000263181?spm=ata.23639746.0.0.c7a77c2caDYbRP